Sunday, December 23, 2012

Choice Based Art Education

Choice Based Art Education


BASA Art Class, Week 3

Based on conversations that I had with the kids last week about being flexible and adapting their projects when things don't go exactly as planned, I decided to read the book Beautiful Oops by Barney Saltzberg.  The class really enjoyed the book and we talked about how you can transform things that might seem like "mistakes".

I also brought a book about Hundertwasser for everyone to look at.  This Austrian artist made incredible use of lines and color in his paintings and architecture.  I thought this might be of particular interest to the kids that have been gravitating to the construction center.

This week I also opened the sewing center.  Several of the kids dug right in and started sewing pillows, pouches and a banner.

I am looking forward to more creative fun in 2013 - happy new year!

Sunday, December 16, 2012

Choice Based Art Education

Choice Based Art Education

BASA Art Class, Week 2

For my "five minute museum" talk at the beginning of class, we had a discussion about lines.  The kids offered comments about where we see lines in two and three dimensional art.  They also listed the kinds of lines you can see: curvy, horizontal, diagonal, etc.  I brought in two books to show work by Miro and Klee.

The next forty-five minutes, all ten kids were actively engaged in art making.  There was a lot of experimentation going on in the construction center.  Some projects did not turn out as desired, but that provided a great opportunity to talk to everyone about how to salvage the parts that you like and remain flexible with your ideas.

The last ten minutes of class were reserved for cleaning up and having a sharing session.  Each student was able to say something about what they made, what their inspiration was and what they learned.  I was pleased with how attentive they were to each other and how receptive they were to talking about their work.  This may have been the first time anyone has asked them to participate in this kind of "critical thinking" in regards to visual art.  In an art class  that is product-oriented, there is little variety or creativity in the student work to be discussed.

At the end of the class one boy said, "This is the best art class ever!  You get to make anything you want!" Hooray for student-directed art!  I couldn't be happier.

Wednesday, September 5, 2012

From Cereal to Journal!


I saw a post for a beautiful hand-made journal using a cereal box for the cover. The original idea can be found here: creme de la craft

When creating my own pocket journal, I made a few changes to creme de la craft's instructions. 

  1. I took half of a cereal box and cut it to 8" x 5.5".  I then scored it on the print side of the box at the 4" mark so I could easily fold it in half with the print side in.  
  2. Next, I sewed a button on the cover using embroidery floss, leaving a long tail that would wrap around the outside of the journal to keep it closed. 
  3. Using a hole punch, I made one hole in a pretty piece of scrapbook paper to allow for the tail-thread to come thorugh, and one hole on the opposite side of the paper to feed the tail-thread though when closing the journal.
  4.  I used spray-mount adhesive to make sure the paper liner was sufficiently stuck. (You will then need to line up the hole-punch with the hole you already made to go through the cereal box.)
  5.  I then took a 2" wide piece of decorative paper, and with spray-mount, fixed it to the spine of the journal.  
  6. I trimmed twenty pieces of notebook paper to fit inside the journal.
  7. Next, I used embroidery floss to stitch the paper together.
I sprayed the backside of the stack of paper with spray-mount and fixed it to the inside of the journal.

Happy Journaling!

Saturday, July 21, 2012

Happy Yarn

 I was trying to think of some small gesture that could brighten a person's day. With the help of Liita, we decided to make some crochet amigurumi and leave them to be discovered in public places.  Our only request is that whoever finds it sends an email to let us know when and where it was found. We are hoping to spread this project  - perhaps these little "friends" can travel around the world!
Lucky Doughnut

Lucky Egg

Maybe you can think of a "guerilla art" project that would make someone happy?

Many amigurumi patterns can be found on the web.  I also love the book Amigurumi World- Seriously Cute Crochet.  This is where I found the pattern for the egg. Once you get the hang of it, have fun making your own designs!

Tuesday, July 3, 2012

Extreme Knit and Crochet!

For the past three weeks I have been volunteering at mini camps held at the Little Bits Workshop in River Forest.  While all of the camps have been fabulous, my favorite week was "Extreme Knit and Crochet".  The kids and instructors had a blast working collaboratively on banners that are now festooning trees on Lake Street.

Balloon Tree

Ice cream Tree


The tree that has garnered the most attention is the Wishing Tree.  Liita had the idea for the kids to make blank tags so passerby could write a wish and hang it from the tree branches.


It is so beautiful to see all of the wishes hanging from the tree!  To see more about this project, you can watch a video on the Little Bits Workshop site. http://thelittlebitsworkshop.com/thelittlebitsworkshop.com/Home.html

Wednesday, June 20, 2012


Garden Project

 The small shade garden in front of our house has troubled me for some time.  I can't seem to grow anything in this spot, or rather I grow it and something eats it!  I decided this year with my daughter's help to create some kind of sculpture garden.  We have been trying to figure out what to make for this space.  My husband said, "What would Howard Finster do?"  Since we both grew up in Georgia, we were fortunate enoguh to meet the legendary folk artist and to visit his Paradise Garden.

"Paradise Garden Located in Summerville, Georgia, is a maze of buildings, sculptures and displays. The Gardens were built from found objects and recycled materials ranging from bottles, bathtubs and toilets to bicycle frames and cast-off jewelry. The setting is a four-acre swampland that is drained by  numerous canals. " (http://www.paradisegardenfoundation.org/)


Well, we will have to see what we can do!  Here is a before picture of our garden:
Below are a few mosaics that we are working on for the garden:
I found some brick pavers in our yard when we moved in.  We collected random plastic toys and old tile bits and used thinset mortar to adhere them to the brick.  After 24 hours we applied the tile grout.  I bought a grout sealer to put on the mosaics - hopefully this will winterize them.

As we create more additions, I will post the pictures.  We have a few empty coffee cans laying around that are begging to be "upcycled"!

Monday, June 18, 2012

Summer Flowers

We are well into June and it has been a while since I posted.  The end of school was very busy - it looks like I have some catching up to do!  I am hoping to spend time on trying new projects this summer.

One thing I stumbled onto was paper flowers.  My niece's Bat Mitzvah is coming up and I wanted to find a handmade item I could contribute to the ceremony.  I was inspired by the tissue paper flowers on Rust & Sunshine's blog.  I like the idea of "upcycling", so I made this flower out of newspaper and hit the edges of the petals with spray paint.  We'll have to see what my niece thinks!


Sunday, May 20, 2012

On-line museum for kids' art!

This year we tried out the website Artsonia. 
Artsonia Art Gallery

I had the kids use oil pastels and dot markers to fill a piece of watercolor paper.  With the help of a room parent, we scanned the artwork and uploaded the images to Artsonia.  With the images on the website, parents could view the gallery and if they desired, they could order a product with the artwork printed on it.

Parents can also create an online gallery on their own to preserve their child's artwork.

Sunday, May 13, 2012

Kitchen Girl Coffee House

As much as I love visual art, I also enjoy the performing arts. In September, Greg and I founded Kitchen Girl Coffee House, a not-for-profit old-time and bluegrass music
concert series.


We did this to support and preserve old-time music making and to create a community gathering place.

The name "Kitchen Girl" comes from an old-time fiddle tune.  We chose it because it represents our love for old-time music, entertaining, and sharing food with friends.


Learn more about Kitchen Girl Coffee House

We were so lucky to have Matt Brown and Jessica Ziegler perform this past Saturday night.

Thursday, May 3, 2012

Look What's Blooming for Mother's Day!


Hope the moms love these flowere!  The kids made them with color diffusing paper.  When we ran out of flowers, I cut some coffee filters in flower shapes and this worked just as well.
Step1- Color with white oil pastel on color diffusing paper or coffee filter
Step 2-Use pipettes to drip liquid watercolor on paper. Watch with amazement as the colors blend!
Step3 - Glue clear glass pieces  ( the kind you get at the dollar store) using Elmer's glue on to the paper.  When the glue dries, the colors shine through.

Enjoy!


Tuesday, May 1, 2012


Urban Crafters Trunk Show

On May 12, I will be participating in a show at Little Bits Workshop in River Forest.  I'm looking forward to showing and selling some of the jewelry I have been making.  The jewelry is made with small wood shapes, glitter and resin.

Urban Crafters Trunk Show at Little Bits Workshop 

Have a look at all of the wonderful items that will be available.

Tuesday, April 24, 2012

Lorax Tree

What happens when you mix branches, wiki stix, pipe cleaners and tissue paper?  Lorax trees of course!  We read the Lorax for Earth Day and asked the kids to bring small branches to school.  A lump of air-dry clay secured the stick to the table.  After that, the kids were allowed to decorate their tree any way they wanted. I think Dr. Seuss would be proud.

Sunday, April 22, 2012

My Favorite Artist

One of my favorite artists is Niki de Saint Phalle.  I  am inspired by the whimsical nature of her work, the bright colors, and the incredible 3-dimensional figures that she made.

A few years ago, the Garfield Park Conservatory had a traveling show of her work. I took this photo inside the conservatory.

Below is an example of one of my own drawings. As you can see , I have been influenced by Niki de Saint Phalle.
 
drawing by Abby H. Reish

To learn more about Niki, visit:
http://www.nikidesaintphalle.com/

Thursday, April 19, 2012

Face Jugs

Lanier Meaders face jug
 While growing up and studying ceramics in Georgia, I became fascinated with Georgia folk pottery and especially face jugs.  Some of them are quite funny, while some of them are meant to be scary. 


After looking at several examples the kids were ready to try making their own interpretations of the face jug.  Looks like they did a pretty good job!

Wednesday, April 18, 2012

Art in Everyday Places

 
I love taking pictures of ordinary things that strike me as anything but ordinary.  A few years ago we took a trip to Japan.  Here are a couple of "ordinary" things we saw in Tokyo.
Manhole Cover

Restaurant Sign     


Have you discovered art in any unexpected places?

Tuesday, April 17, 2012

Earth Day Art Project

We found some nature stencils in our supply closet.  I thought it would be great to have the kids pick a design and paint it onto newspaper as a recycled art project for earth day.  When they were done, I found a box of cork floor tile that we could use to mount their art. They look great hanging in our classroom!


Monday, April 16, 2012

Pinch Pot Rattle

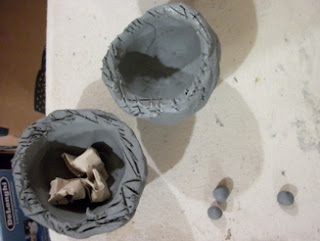
The after-school art class begins this week.  For the first project we are going to make a rattle out of clay. Ceramic rattles appear throughout history in many different cultures.  They were used (and still are!) as musical instruments and children's toys.

To begin the project, all of the children will receive a baseball-size lump of clay that they will need to break into three pieces.  The easiest way to get kids to make the pieces round is to have them "clap" with the lump of clay between their two hands.

Next, have the children make two pinch pots.  The children should hold a ball of clay in one hand to form the pinch pot.  (If it is formed on the table they will end up with a flat bottomed pot.)  Then, slip and score the lip of both pots.  Here is the magic part - use small bits from the third ball of clay to make round "beads".  Wrap each bead in newspaper and put inside one of the pots.

Why put the beads inside paper?  To keep them  from sticking inside of your wet pot!  The paper will burn away during the firing and those little bits will make music.  Carefully put the two pots together, smoothing away the seam.


Now the kids have a hollow ball that can be lightly paddled into shape. The clay left over from their third lump can be used to add on features.  I am going to have the kids make an animal head.  For my example, I made an homage to Julius - I am a huge Paul Frank fan!
Make sure there the kids poke at least one hole in the rattle to allow air to escape.  

I am  looking forward to seeing what the kids come up with.  I'll post pictures of their work in progress.

Sunday, April 15, 2012

Still Life With Preschoolers

We have an art show coming up in May. I decided to work with the kids on drawing a still life. I set up two vases filled with fake tulips and blue glass marbles.  Each child was given a small canvas to work on.  It was fun to watch them really thinking about the flowers and how to plan their design.


                    These drawings are great examples of different stages in development.

To have some cohesiveness  with this project, I first asked the children to do a line drawing of the vase and flowers with a black Sharpie marker.  I then asked them to color the flowers and marbles with oil pastels.  Lastly, I had them paint over the whole canvas with blue watercolor. 

I think their parents will be significantly impressed! 
 

Classroom Projects

Photos of Classroom Projects

Below are some photos of projects we have done this year:
watercolor and oil pastel

marbleized paper

paper weaving  


  The kids especially love the marbleized paper projet. Here is the method I used:

 1) Spray about an inch of foam shaving cream ( not gel) on a tray and smooth with a plastic knife or palette knife.

2) Have three different liquid watercolors in cups on the table for children to use. The kids use spoons to drip colors on top of the shaving cream.

3) Next, children use a plastic fork to swirl the colors.

4) Lay a piece of cardstock on top of the shaving cream and lightly push the paper into the shaving cream.

5) Lift the paper off of the tray and use a piece of cardboard to remove excess shaving cream. (the excess can be put right back onto the tray) The shaving cream can be used multiple times.

The watercolors stay vivid and the paper is almost instantly dry.  The chldren are amazed at the colors and designs that are on their paper!

Chihuly Inspired Art

It was time to spruce up the classroom for spring.  We looked at images of Dale Chihuly's glass work and we decided to use coffee filters to represent his art . http://www.chihuly.com


I had the children color coffee filters with magic markers. When they were done, the kids put the filters on top of a waxed paper cup. Next, they took a small spray bottle filled with liquid fabric starch and saturated the coffee filter. They dried nice and crisp and easily popped off the cups.
Here is our interpretation:

Preschool Chihuly Art

Play-dough Sunday

Pink Lemonade Play-dough!

Sunday has become play-dough making day at my house.  I like to surprise the kids with a different scent each week - just a little something to make Mondays fun.

Here is the recipe I like to use:
4 c. flour
4 tsp. cream of tartar 
6 tbsp. vegetable oil 
4 c. water
3 packs kool-aid mix (without sugar)
2 c. salt
Mix dry ingredients thoroughly. Add the water and oil and stir into dry ingredients. Stir over medium heat several minutes until mixture forms a ball. Let cool in pot a few minutes, then knead until smooth. Store in an airtight container.